

READY TO START? YOU WILL NEED TO HAVE A WORKING KNOWLEDGE OF PSP.
THANK YOU TO THE TALENTED CREATORS OF MY SUPPLIES
SUPPLIES NEEDED:
Tube of Choice: I'm using the amazing art of Keith Garvey.
You may purchase a license to use his work here
Scrap kit of Choice: I'm using a wonderful kit made by Wicked Princess Designs (Wonderfully Wicked).
Mask: Wescotlass Tutorials (WSL_Mask53)
Font of Choice: I'm using Century Gothic and Pea Carrie Script.
EyeCandy 3.1 Glass
EyeCandy 3.1 Glow
Written in PSPX1
Open a 600x600px canvas and flood fill white.
Open one of your pattern papers and paste on your canvas.
Add your mask.
LAYERS->LOAD Mask WSL_Mask53.
Merge Group.
Add a light drop shadow.
Now get your preset shape tool and draw a small circle.
Place the circle directly over the mask.
This is how you will create your circle text.
Now select your black frame and place on canvas overlapping eachother.
Now open your tubes and place each in the frame of your choice.
Add drop shadows to those.
Add your name.
This is where we will use eye candy.
As always I'm using the following settings.

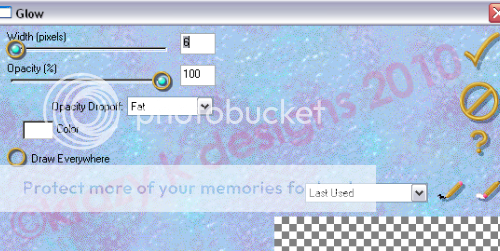
You'll also want to add glow around your circle text.
I used the following settings
Add a drop shadow to your name.
Don't forget to add your copyright info!!!!
Crop off the excess and save as png document
(with or without white background)


No comments:
Post a Comment
Note: Only a member of this blog may post a comment.