

THANK YOU TO THE TALENTED CREATORS OF MY SUPPLIES
SUPPLIES NEEDED:
Tube of Choice: I'm using the amazing art of Keith Garvey.
You may purchase a license to use his work here
Scrap kit of Choice: I'm using a wonderful kit made by Designs by Helly (Toxic).
Mask: Wescottglass Tutorials (WSL221)
Font of Choice: I'm using Copper Blk Std
EyeCandy 3.1 Glass
Download my supplies here.
Written in PSPX1
Also open a plain paper from your kit and resize it to 50%
Using your paint bucket tool with pattern selected, create a new layer and flood
fill with your paper.
Now we will add our mask.
LAYERS->LOAD MASK WSL221
Merge your group.
Open a patterned paper and resize it 50%
Using your circle shape select your base color as the paper and select the stroke color with eyedropper
For example, my paper is pink with brown polka dots, my stroke would be brown.
Have settings for width to be 3px and draw a circle in the left corner of your canvas.
Convert to raster
Open your second patterned paper and resize it to 50%
Now draw a rectangle with the new pattern with a width of 7px
Convert to raster
Using your rectangle selection tool, draw a square inside of your rectangle to create a frame.
Delete that selection
Now open your elements from your kit and place them where you like.
Now we'll add the image inside the frame.
Select your tube and place it behind your rectangle frame.
Use your rectangle selection tool and draw a square around the frame opening.
Selections->Invert
and delete.
And now we'll add your main tube, place where you desire
Under your circle layer you will need to create another circle. Make this one a little bigger than the original
Leave it as a vector and add your text.
Then delete the vector layer
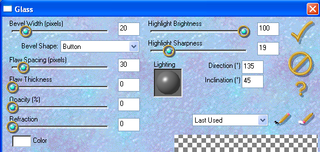
Now add your name, this is where we will use EyeCandy.
I used the following settings
Add a drop shadow if you like.
My settings were 4....2....44......4
Add your copyright info and crop off the excess canvas
Save as png with or without white background


No comments:
Post a Comment
Note: Only a member of this blog may post a comment.