

THANK YOU TO THE TALENTED CREATORS OF MY SUPPLIES
SUPPLIES NEEDED:
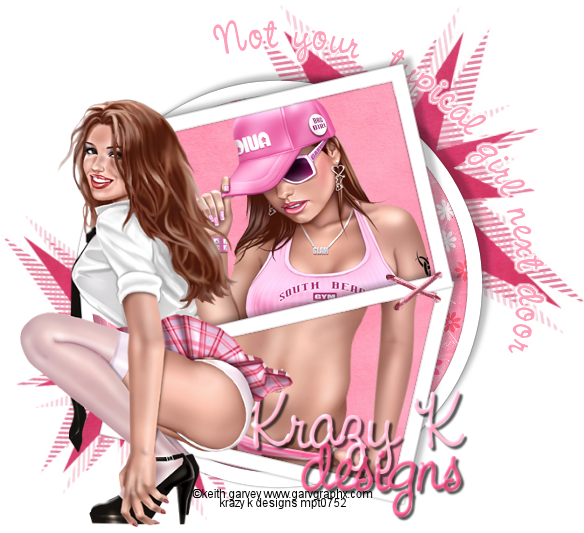
Tube of Choice: I'm using the amazing art of Keith Garvey.
You may purchase a license to use his work here
Scrap kit of Choice: I'm using a wonderful kit made by Sweet Shoppe (Just Lily).
You may purchase this kit at their store.
Mask: Vixpsp (Vix_Mask61)
Frame: Weescotslass (WSL_frame5)
Font of Choice: I'm using CAC Pinafore
EyeCandy 3.1 Glass
EyeCandy 3.1 Glow
MADE USING PSPX1
Open a new 600x600px canvas and flood fill white.
Open your frame and paste as new layer.
Now open your first paper and paste as new layer under frame.
Grab your selection tool and select the visible rounded sections of the frame.
Selections->Invert->Delete.
Open your second paper and repeat those steps for the square frames.
Now open your first tube.
This one will go inside the frames.
Once you have placed your tube where you like, get your selection tool
and select the inside of the square frame.
Selections->Invert->Delete.
Grab your shape tool and draw a circle behind the frame.
Make it a little larger than your circle frame.
Now get your text tool and create your text on a curve.
Duplicate your text.
On the bottom layer we will add the glow.
We'll use the following settings 4, 100, fat, white
You can delete your circle vector layer now.
Create a new layer under everything except your white layer.
Pick out a color with your eyedropper and flood fill your new layer.
Now we'll add our mask.
Layer->Load/Save Mask->Load mask from disk.
Merge Group
Place this layer in the top corner where you text is.
Now duplicate the mask layer.
Place it in the corner diagonal from the text.
Open an element such as a staple or paper clip from your kit
Paste as a new layer.
Place it somewhere so the two frames will be connected.
It's finally time for your main tube!!
Place it on the opposite side of your text.
On to your name.
And we will add eye candy glass to this layer.
As always, I used the following settings
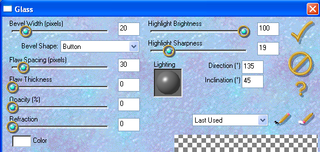
20, button, 30, 0, 0, 0, white, 100, 19
Add a drop shadow to your name and tubes.
Don't forget your copyright!!!
Now crop off the excess canvas and save as a png
With or without the white background.


No comments:
Post a Comment
Note: Only a member of this blog may post a comment.